
Sometimes the New Year brings with it a bottle of bubbly, gets marked by a fireworks display, or is contemplated on a long hike in the woods. Regardless of the activities that precede or follow the turning of the calendar, the occasion should be marked annually with a show-stopping meal. Preferably one that can be mostly made ahead and baked relatively unattended so you, too, can enjoy the festivities happening outside of the kitchen.
Enter Wellington.
The internet tells me Beef Wellington was named after Arthur Wellesley, Duke of Wellington, who commanded coalition troops in the Battle of Waterloo, but none of my research books on British foods (I have many) nor a search of articles within the University of Maine’s library holdings could confirm that. Culinary historians could argue that the French have been serving a similar dish, boeuf en croute, since well before Wellington et al. defeated Napoleon in 1815.
Lore aside, recipes published since 1815 in English, say Beef Wellington is made with a long piece of seared beef tenderloin. First it gets slathered with mustard and then mushroom duxelles. Sometimes it’s wrapped once more in prosciutto (which the Brits call Parma ham) but it’s always enveloped in puff pastry. This dish was all the rage in the U.S. in the 1960s and ’70s at white tablecloth establishments.
Regardless of its lineage, this elegant, indulgent dish has gotten a second wind of late due to celebrity chefs like Gordon Ramsay. He serves one built for two eaters at his high-end restaurants around the world, has forced MasterChef contestants to prepare it for him, and has declared it will be on the menu at his own last supper.
In late December 2023, I shared Ramsay’s version of Beef Wellington for Two with my daughter (she’s a big fan) at his Bread Street Kitchen & Bar in the Limehouse neighborhood of London. It was indeed a showstopper. And it was delicious. But it was also £115 (about $150), my average weekly budget for groceries. It was my birthday, so my husband didn’t balk, at least not when I was looking.
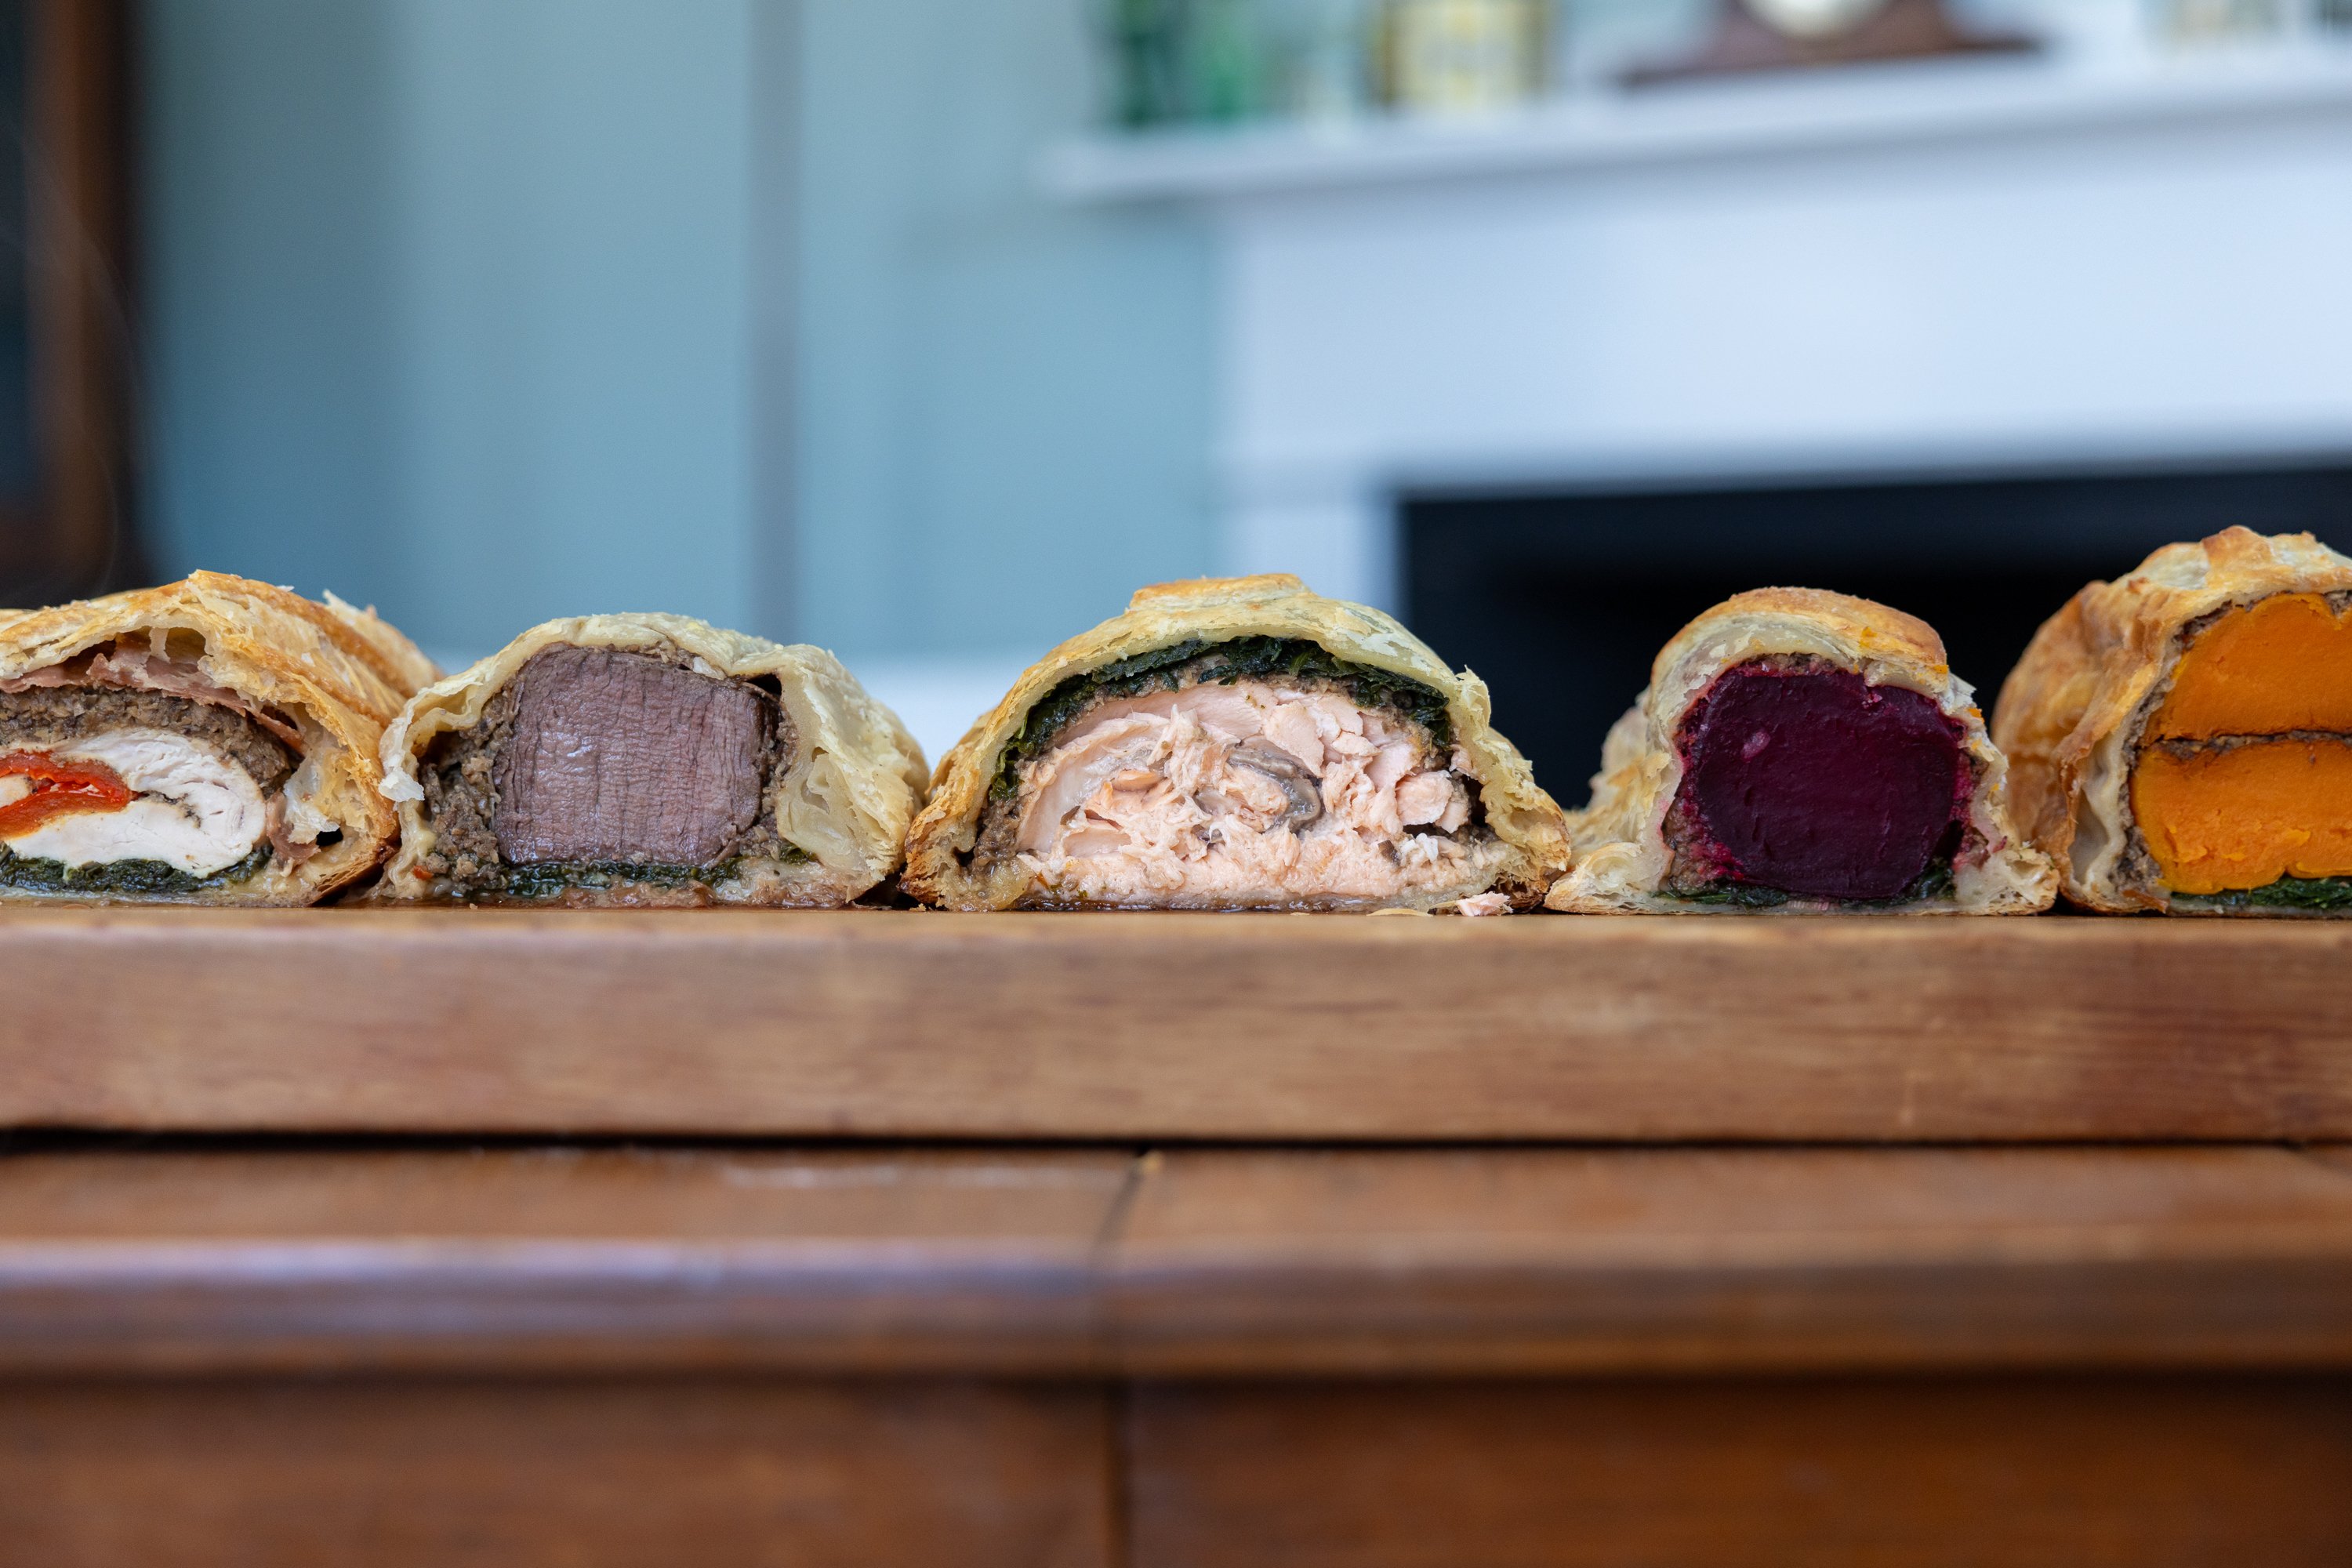
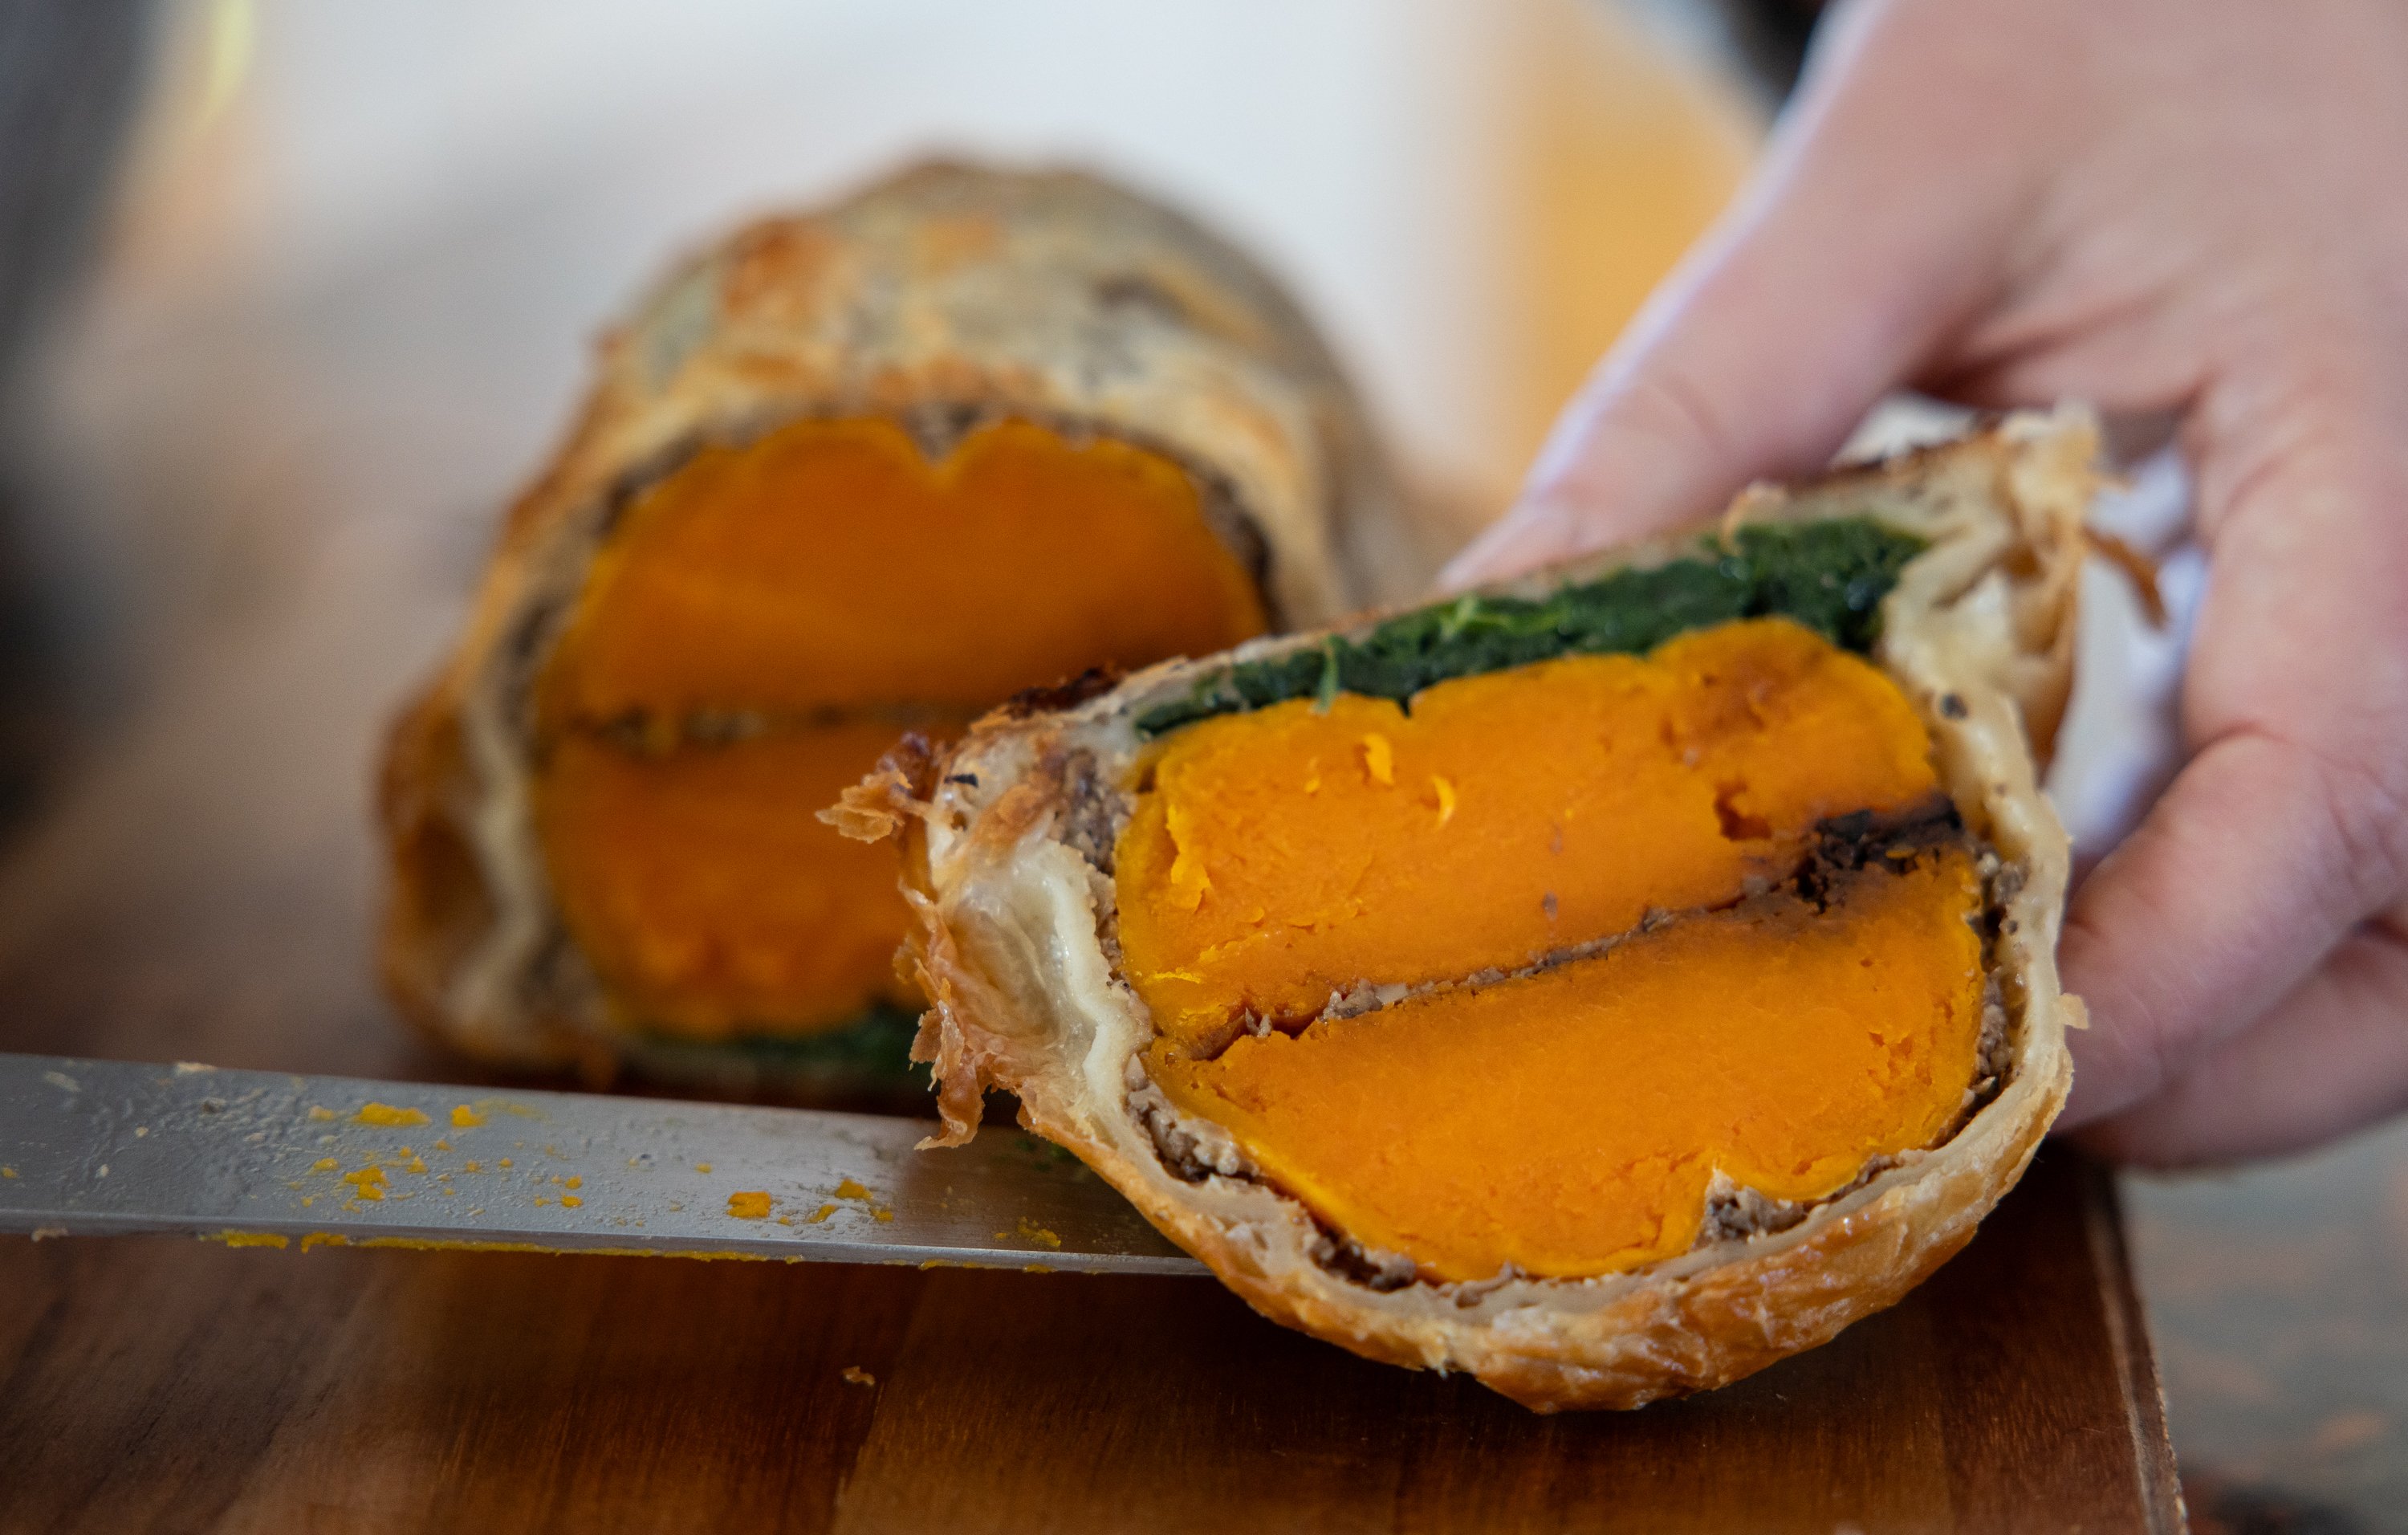
Two years on, with the price of beef tenderloin in Maine weighing in at $30-$42/pound, I’ve done some experimenting with alternatives for my New Year’s dinner. In the past month I’ve made Beet Wellington (in single servings), Butternut Squash Wellington (the New York Times has a great recipe), Salmon Wellington (more of a French saumon en croute recipe), and Turkey and Roasted Red Pepper Wellington (my own recipe).
Here are the lessons learned from my Anything Wellington exploration.

Lesson No. 1. To quote my perfect pie-making friend Cathy Barrow, who wrote “Pie Squared” and “When Pies Fly,” “Nobody likes a soggy bottom!” To make sure the bottom crust of every pie gets cooked to crispy perfection, she preheats a pizza stone and bakes all her pies on top of it. But while the pizza stone works to crisp up the pastry from the outside, you must also make sure the filling is as dry as possible to prevent the Wellington from getting a soggy bottom.
That means cooking the mushrooms and shallots in the duxelles until their natural liquids have completely evaporated. Steamed greens should get a good squeeze in a kitchen towel before adding them. Root vegetables need to be roasted (as opposed to boiled or steamed) so they don’t weep water while the Wellington is baking. Fish and poultry should be salted and left to sit for 10 minutes before getting patted dry with a towel and placed into the pastry.
Lesson No. 2. Season, season, season, and season some more.
Puff pastry is buttery, but also bland. Therefore, the filling(s) should be extra flavorful. Season the main ingredient well. Season the duxelles well. And season the greens well. Those readers watching their sodium intake, please don’t grab your chest and stop reading! Wellington fillings can be seasoned with things other than salt! Garlic and/or onion powder will make a butternut squash filling sing. Adding a lot of fresh thyme leaves to the duxelles amplifies the mushrooms’ earthy flavor. Pickled red peppers at the center of a turkey Wellington add a pop of color and flavor. Sautéing greens with slivered garlic and red chili flakes amps up that layer. And slathering a bit of Dijon mustard on salmon is always complementary.

Lesson No. 3. Keep the puff pastry consistently thick.
I tested my Wellingtons with higher-end Dufour’s puff pastry (regular and plant-based for $10-$11 at Hannaford, Whole Foods, and some natural food stores), more affordable Pepperidge Farm ($6.25-$6.50 at most grocery stores) and generic puff pastry (Hannaford Taste of Inspiration, $4.69). Dufour’s gives the highest puff, but all will work for an Anything Wellington. All three brands come folded inside the package and need a bit of a roll with a heavy pin to flatten to a uniform thickness before you assemble the Wellington. Aim for 1/8-inch thick.
I also found that a fancy fold-over crimp around the edges of any Wellington is a bad idea. Unlike with a short-crust pie situation, the puff of the pastry prevails over the patterned pinches, and it’s rarely a pretty sight. Stick to using the tines of a fork to securely press the top layer of the pastry to the bottom one. Do use the trimmings of puff pastry to decorate the top of the Wellington, though. I use a ridged pastry cutter to make rick-rack type ribbons that I lay over the top of the assembled Wellingtons.
Lesson No. 4. Always assemble the Wellington on the baking sheet you will be baking it on. Trying to transfer the Wellington from the counter to the sheet after it’s been assembled doesn’t end well, trust me. Be sure you’ve lined the baking sheet with a silicone mat or parchment paper. Otherwise, the pastry will stick, making it hard to move the baked Wellington to a serving platter without breakage.

Lesson No. 5. Egg wash to taste.
How you make your egg wash and when you apply it to the puff pastry will affect how the finished Wellington looks. An egg white wash will give the pastry a sheen but not affect the browning. An egg yolk wash has the opposite effect: increased browning but little sheen. My preferred egg wash uses both white and yolk, combined with a pinch of salt and a teaspoon of hot water and beaten well with a fork. The combination is thin, brushes on evenly, and adds both sheen and better browning.
Lesson No. 6. Place the chilled Wellington in a hot oven.
One of the benefits of Wellington is that you can assemble it ahead of time. It will store, well-wrapped in the refrigerator, for 24 hours. For the best puff, though, the assembled Wellington should go straight from the fridge to a hot (400 degrees F) oven, stopping on the counter just briefly for the aforementioned egg wash. The pastry will take 30-35 minutes to cook completely. If the Wellington has an already-cooked vegetable at its core, that should be adequate time to warm the fillings, as well.
If you have fish or poultry in your Wellington, however, it’s slightly more involved: You need to get the insides cooked to 140 and 165 degrees F, respectively, without burning the pastry to a crisp. To do that, 20 minutes after you put the Wellington into the oven, reduce the heat to 325 degrees F. About every 15 minutes thereafter, slip an instant-read thermometer into the center of the Wellington to check the protein’s temperature. If you notice the top of the Wellington getting too browned, lay a piece of aluminum foil loosely over the top and continue cooking.
Let all Wellingtons sit for 15 minutes before attempting to serve them.
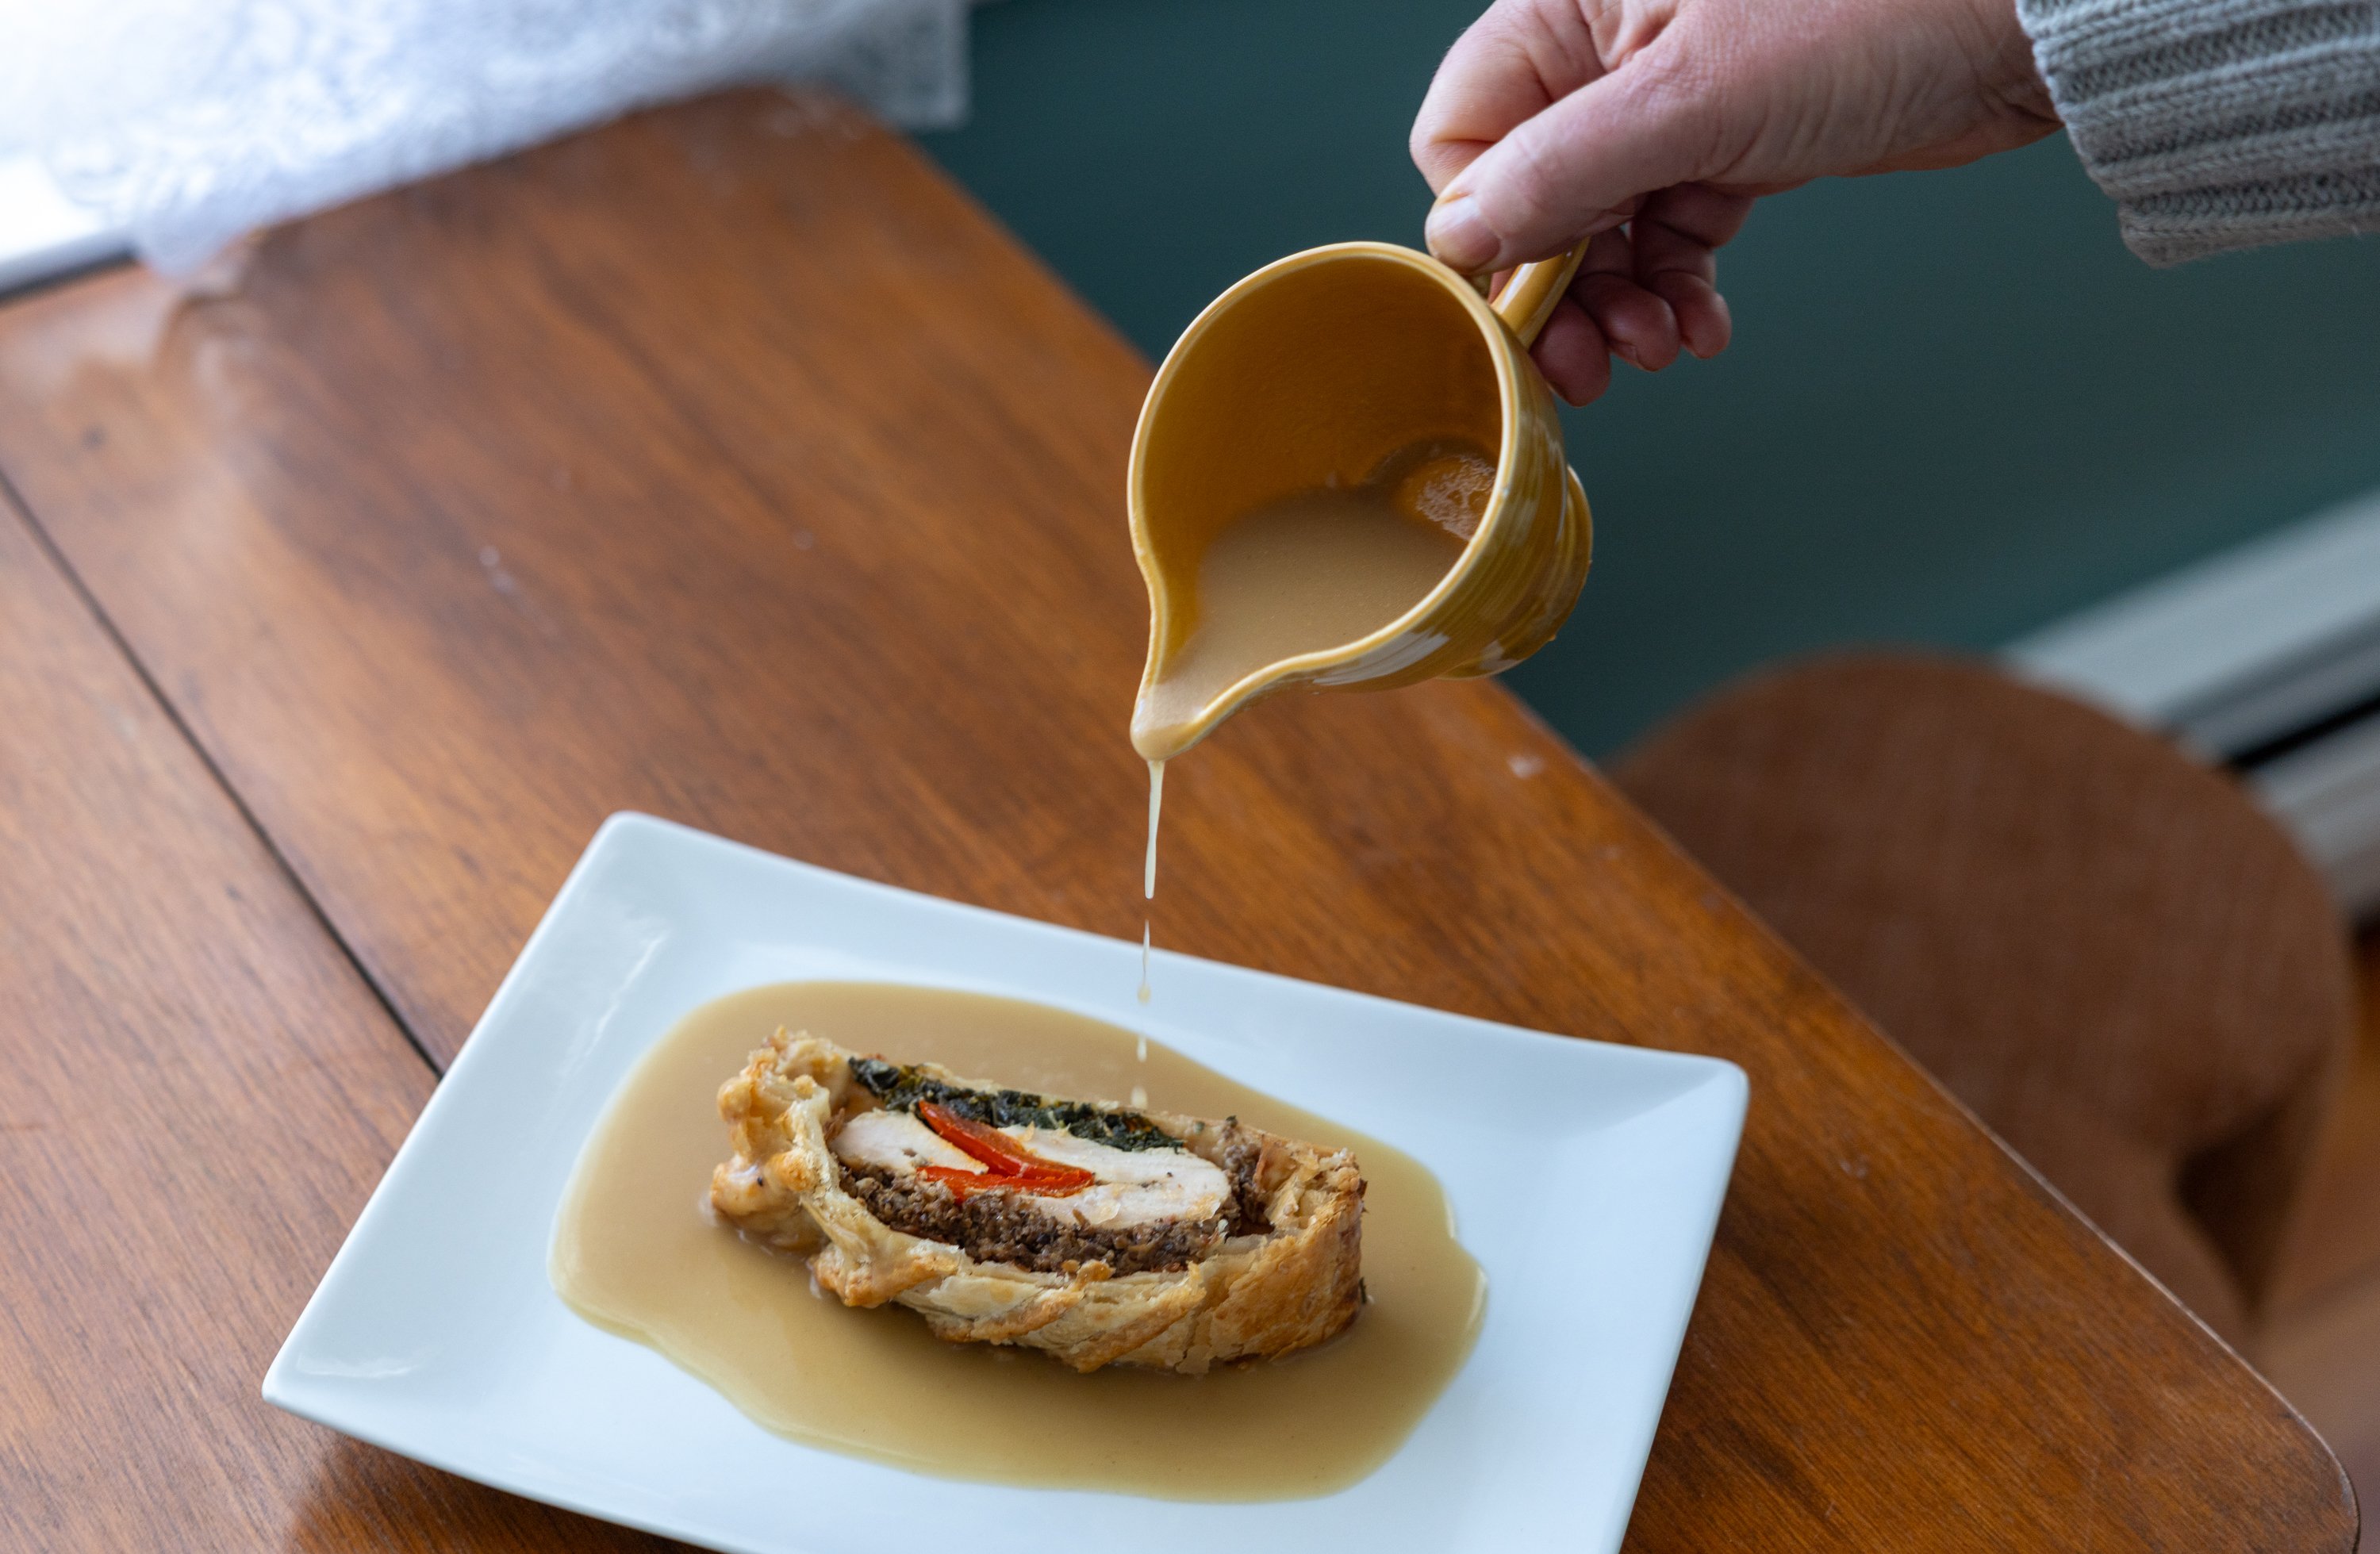
Lesson No. 7. Don’t forget the sauce.
Remember lesson number 1? Any Wellington will still have some natural moisture content. But every Wellington will benefit from a sauce served alongside. A horseradish cream works as well for Beet or Salmon Wellington as it does for the classic beef variety. A rosemary-scented vegetable or chicken broth gravy thickened with roux would complement a butternut or turkey Wellington.
Lesson No. 8. Use a sharp slicing knife.
The most impressive way to serve this showstopper dinner is at the table. Let the Wellington rest, then transfer it to a serving platter and carry it — with festive ceremony — to the dining room. A very sharp slicing knife is your best bet for pretty cross-section servings. Avoid using a serrated bread knife as the puff pastry will catch and tear into a mess. Use quick, decisive cuts to carve off ¾-inch-thick pieces, using a spatula to move them onto individual plates. Then pass the sauce, sit back and bask in the glory of presenting your tablemates with a show-stopping Wellington.
TURKEY AND ROASTED RED PEPPER WELLINGTON
This is a showstopper that will start your 2026 off on an elegant foot. It’s a multistep operation, for sure. But you can make 90% of it ahead of time, giving you plenty of time to enjoy the New Year festivities with your guests. Some of it, in fact, must be made ahead as it requires chilling or freezing time. When you’re ready to bake the Wellington, you simply have 45 minutes of hands-off baking just before dinner is served.
Serves 4-6
For the turkey:
2- to 3-pound boneless, skinless turkey breast
Kosher salt
Black pepper
Garlic powder
3 whole roasted red peppers (skin and seeds removed, jarred is perfectly fine)
2 tablespoons olive oil
For the duxelles:
2 tablespoons unsalted butter
1 tablespoon olive oil
¼ cup finely chopped shallot
2 garlic cloves, minced
1 pound assorted mushrooms (like shiitake, white button and cremini), finely chopped
Kosher salt
Freshly ground pepper
3 tablespoons finely chopped assorted herbs (like thyme, rosemary and flat-leaf parsley)
For the greens:
1 tablespoon olive oil
2 garlic cloves, minced
Pinch of red chili pepper flakes
2 cups chopped kale
For the Wellington:
8 thin slices of prosciutto
1-2 tablespoons Dijon mustard
2 (9 x 9-inch) sheets frozen puff pastry, thawed in the refrigerator and rolled to an even 1/8-inch thickness
Egg wash: 1 egg beaten with a pinch of kosher salt and a teaspoon of hot water
Flaky sea salt
Gravy, for serving
To prepare the turkey, lay the breast onto a meat-safe cutting board. Use a sharp knife to butterfly the breast to create an even thickness throughout. Use a meat mallet to pound out the thicker bits. Season the turkey generously with salt, pepper and garlic powder on both sides. Transfer it to a sheet tray with a wire rack and loosely cover it with plastic wrap. Refrigerate it on the lowest shelf of the fridge for at least 2 hours but not longer than 12.
Preheat the oven to 250 degrees F. Remove the turkey from the refrigerator. Line the top of the turkey breast with the roasted red peppers, laying them as flat as possible all over the surface. Roll the turkey breast up into a cylindrical shape. Use kitchen twine to truss and hold this shape. Tear off a large square of aluminum foil and place the trussed turkey breast at one end of the piece of foil. Drizzle the olive oil over the turkey. Tightly roll the turkey up in the foil. Tighten the two ends like a candy wrapper.
Place the turkey cylinder, seam side up, on a clean sheet tray lined with a wire rack. Slide it into the oven and cook until a thermometer reads 160 degrees F when inserted into the very center of the cylinder. This should take 2 to 2 ½ hours. Remove from the oven and let cool for 30 minutes in the foil, and then 30 minutes with the foil removed.
To make the duxelles, melt the butter and oil in a large skillet over medium heat. Add the shallot and garlic; cook, stirring, until softened, 3-4 minutes. Add the mushrooms and 1/4 teaspoon salt; cook, stirring, until mushrooms have softened, released their liquid, and are beginning to caramelize, 8-9 minutes. Season with pepper and additional salt to taste, if necessary. Stir in the herbs and set the duxelles aside to cool to room temperature.
To make the greens, warm the oil in a large skillet over medium heat. Add garlic and chili flakes. Stir and cook until fragrant, about one minute. Add the kale, and stir to coat the kale in the oil. Add 1 tablespoon water. Cover and cook until the kale is wilted, 3-4 minutes. Uncover and cook until all the liquid is gone, 2-3 minutes. Set aside to cool.
To assemble the filling, lay two 18-inch-long pieces of plastic wrap on the counter, overlapping by about 4 inches. Lay the 8 pieces of prosciutto down to make one large square, overlapping each by at least ½-inch. Spread the Dijon mustard all over the prosciutto leaving 2-inches unslathered at one side. Then spread the cooled duxelles evenly over the mustard-coated prosciutto, again leaving the 2-inches of prosciutto uncovered at one side. Press the duxelles into a solid layer as thinly as possible, about ¼-inch thick.
Carefully cut and remove the twine from the turkey. Place the cylinder it at the very bottom edge of the prosciutto, mustard, duxelles square and, letting the plastic wrap do the work for you, tightly wrap the prosciutto all around the turkey. Fold the edges on the sides into themselves, creating a tight bundle where no duxelles or turkey is exposed. Wrap the cylinder tightly in the plastic wrap and place it in the freezer for 30 minutes.
To assemble the Wellington, remove the filling from the freezer and carefully unwrap it. Lay one piece of puff pastry on a baking tray lined with either a silicone mat or parchment paper and use a rolling pin to roll each square of puff pastry to a width that is at least 2 inches wider than the turkey cylinder. Spread the cooled greens in the middle of the pastry. Place the turkey cylinder on top of greens. Lay the second piece of puff pastry over the top of the turkey cylinder and gently tuck the dough around it. Trim the edges of the puff pastry, leaving about an inch at the base of the cylinder on all four sides. Use a fork to crimp the top and bottom pieces of the dough together for a tight seal.
Put the Wellington, covered with plastic wrap, back into the fridge for at least one hour but not more than 24.
To bake the Wellington, preheat the oven to 375 degrees F. Remove the Wellington from the fridge. Remove the plastic. Use a knife to score the top of the Wellington. Brush it all over with egg wash. Sprinkle flaky sea salt over the top.
Bake for 40-45 minutes, until the puff pastry is a deep golden brown. Rotate the pan halfway through the baking time and brush a second time with the egg wash. Let cool for 10-15 minutes before slicing and serving with warm gravy.